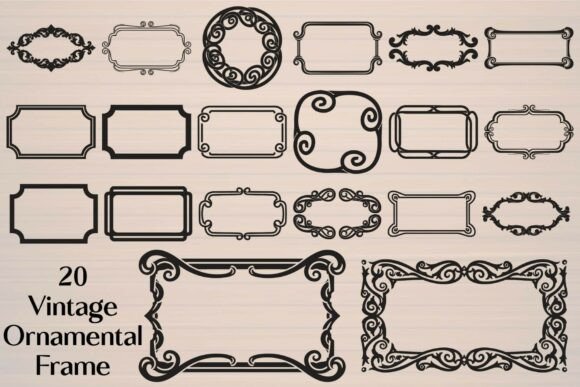
Vintage Ornamental Frame: Elevating Your Designs with Timeless Elegance
In the world of graphic design and digital crafting, trends come and go with dizzying speed. Yet, there is one aesthetic that refuses to fade: the classic, sophisticated charm of vintage styling. A Vintage Ornamental Frame is more than just a border; it is a design element that instantly communicates quality, tradition, and attention to detail. Whether you are designing wedding invitations, creating branded packaging for a small business, or working on a personal scrapbooking project, the right frame can transform a simple layout into a masterpiece.
However, many creators overlook the technical and artistic nuances of using these assets effectively. It is not enough to simply drop a decorative element onto a canvas. To truly leverage the power of this collection of 20 Vintage Ornamental Frames, you must understand how to integrate them seamlessly into your workflow. This guide explores common pitfalls designers face when selecting and using ornamental graphics and provides practical advice to ensure your final output is polished, professional, and visually stunning.
The Misconception of "One Size Fits All" in Vector Graphics
One of the most frequent mistakes beginners make is assuming that all digital files are created equal. You might download a bundle, open a low-resolution JPEG, and attempt to stretch it to fit a large poster or banner. The result is often pixelated, blurry, and unprofessional. This happens because raster images (like JPGs and PNGs) are made of pixels, which have a fixed resolution. When you enlarge them beyond their original dimensions, the software has to guess what the missing data should look like, leading to a loss in quality.
The Better Approach: Always prioritize vector formats such as EPS and SVG for any project that requires resizing. The included files in this premium bundle offer high-quality vector artwork that is fully scalable. This means you can shrink a frame down for a delicate jewelry tag or expand it to cover an entire wall art print without losing a single crisp line or curve. Use the PNG and JPG files only for quick previews or web-based social media graphics where the dimensions are fixed and small.
Overlooking Compatibility with Cutting Machines
For crafters using devices like Cricut or Silhouette, a common oversight is ignoring the file structure required for clean cuts. Many ornate designs contain intricate details, graceful curves, and flourish frame elements that can be challenging for cutting blades if the file is not optimized. Using a complex PDF or a layered PSD file directly in cutting software can lead to jammed mats, torn paper, or incomplete cuts.
The Practical Fix: Utilize the SVG files provided in this collection. SVGs are specifically designed for web and cutting machine compatibility. Before sending your design to cut, always use the "weld" or "union" function in your software to merge overlapping paths. This ensures that the cutter treats the ornamental label as a single continuous shape rather than hundreds of tiny, disconnected pieces. This simple step saves time, reduces material waste, and ensures your laser-cut designs or paper crafts look pristine.
Neglecting Visual Hierarchy and Balance
A beautiful frame can easily overpower the content it is meant to highlight. A frequent design error is choosing a frame that is too heavy or intricate for the text inside it. If you place a dense, highly detailed vintage plaque around a simple, small font, the eye gets lost in the decoration, and the message becomes secondary. This imbalance creates visual noise rather than elegance.
Design Advice: Consider the weight of your typography. If you are using a bold, serif font for a certificate or invitation, pair it with a frame that has substantial lines and bold corners. For lighter, script-based designs, choose a frame with finer lines and more open space. The 20 unique designs in this bundle range from heavy, ornate borders to lighter, stylish decorative outlines. Test different combinations by placing your text first, then layering the frame behind or around it. Adjust the opacity or color of the frame if necessary to ensure it complements rather than competes with your message.
Ignoring Color Context and Customization
Many users assume that because these frames are delivered as elegant black ornamental graphics, they must remain black. While black offers a classic, high-contrast look, it may not suit every brand identity or event theme. Leaving the frames in their default color can make your design feel generic or disconnected from the rest of your branding palette.
Creative Solution: Take advantage of the editable nature of these files. In software like Adobe Illustrator, CorelDRAW, or even Canva, you can easily change the color of the vector paths. Try using deep navy, forest green, or metallic gold tones to add a layer of sophistication. For wedding invitations, soft pastels or rose gold can create a romantic feel. For branding, match the frame color exactly to your company’s hex code to maintain consistency across packaging and signage. Remember, the goal is cohesion; the frame should feel like an integral part of the design, not an afterthought.
Underutilizing the Versatility of the Bundle
It is easy to fall into the trap of using these frames only for their most obvious purpose: framing text. However, limiting their use to rectangular borders ignores their potential as standalone decorative elements. Overlooking this versatility means missing out on opportunities to enhance logos, create unique watermarks, or add flair to social media graphics.
Expanding Your Usage:
- Logo Design: Use a circular or shield-shaped ornamental frame to encase a monogram or initial, creating an instant heritage-style logo for small businesses.
- Web Elements: Crop sections of the flourish designs to use as dividers between website sections or as corner accents on digital newsletters.
- Packaging Accents: Place a small ornamental label on product packaging to highlight key features like "Handmade" or "Organic," adding a touch of premium appeal.
- Scrapbooking: Layer multiple frames with different opacities to create depth and texture in journaling pages.
Final Checks Before You Publish or Print
Before you finalize your project, take a moment to review the technical specifications. Ensure that your document color mode matches your output method. For print projects like greeting cards, certificates, or wall art, convert your file to CMYK to ensure accurate color reproduction. For digital use, such as social media graphics or email headers, keep the file in RGB.
Additionally, verify that all text is outlined or flattened if you are sending the file to a professional printer. This prevents font substitution issues that can ruin the alignment of your text within the vintage ornamental frame. By paying attention to these details, you ensure that the timeless style of your design is preserved from screen to print.
Incorporating a Vintage Ornamental Frame into your creative toolkit is an investment in quality and versatility. By avoiding common technical and design mistakes, you can unlock the full potential of these 20 premium designs. Whether you are a seasoned designer or a hobbyist exploring DIY crafts, these elements provide the perfect foundation for creating work that is both elegant and enduring. Download, customize, and create with confidence, knowing that you have the right tools to bring your vision to life.